
Wasn't Tricia's post yesterday great? If I didn't already have those earrings from her, I'd enter the giveaway myself! :) I've tried jewelry making a time or two and already have the supplies, maybe I can make my own now in different colors...
I thought I'd repost what I wrote for her blog since I made a cute skirt for me, and you know that doesn't happen very often. So here's a quick tutorial on an easy Anthro-inspired elastic-waist skirt.
As Tricia's more into the accessory side of fashion and I'm more into the sewing side of it, we thought it would be fun to swap blogs for a day and teach each other's readers something different. I thought I'd bring y'all a quick and easy tutorial for a simple skirt that won't take long to whip up, but will get lots of compliments. So let's take a look at our inspiration piece...

Like many others in blogland, I LOVE how Anthropologie makes life look so sweet and simple and fashionable. But my wallet DOES NOT. So, like many others I often bookmark my favorite looks to see if I can recreate them at home for much, much less. I saw this skirt and liked the look but not the $68 price tag. $68 for some material sewn together with elastic and some ribbon??? C'mon people! If you're with me, let's get started.
I gathered up some supplies: fabric of my choice, 1-inch elastic, ribbon and my usual sewing supplies of machine, matching thread and some pins. Oh, and you'll need an iron.

Since this is a tutorial for beginning sewers, I'm changing a few things about the skirt. We won't be adding the horizontal pintucks (so I used a fabric that had enough visual interest not to miss them.) and I'm leaving out the pockets. While it looks like the dress has a drawstring waist and the name implies that, it's actually an elastic waist with a decorative ribbon tie. We'll be doing the same. Drawstrings aren't hard to do, but elastic is that much easier....
Here we go:
WARNING...BORING MATH COMES FIRST. Stay with me, I promise it's not as bad as it looks!1. To make this skirt fit you, measure your waist. Mine was 18 inches, so... haha, just kidding. Mine was about 35 but we're going to go with 36 for ease in math. We want to multiply this number by 1.5 so our skirt will have some poof to it. We'll be drawing the waist back in with elastic before we finish. Since our skirt will have 2 pieces (a front and back) we take our multiplied waist measurement and divide it in two. But we also have to add an inch to each piece for our seam allowance (or what we'll use when we sew it together.) So, my width measurement is 28 inches. If you'd like your skirt to have more "poof" then double the original waist measurement...the poof factor is up to you!
(36 x 1.5) / 2 + 1 = 28 inches.

19 + 2 (for hem) + 2 (for waistband) = 23 inches

3. Whew, let's all take a break from that awful math and get started on the creating. On an important sidenote here, you should ALWAYS wash and dry your fabric before making any kind of clothing. Fabrics shrink at different rates and it would stink if your cute skirt shrunk in the wash to become doll clothes!
Now, lay out your fabric and measure out your rectangles. I have my fabric folded in half so I only have to cut once. I'm using a large ruler and cutting mat with a rotary cutter, but plain old (sharp) scissors work too. I'm spoiled by my quilting supplies and would never go back to scissors if I didn't have to! I cut out the two rectangles with our measurements above and I'm ready to start sewing.

4. Finally, we get to sit down at the sewing machine! You're going to thread your machine with a matching thread and bobbin and then line up your skirt pieces with the right sides facing each other. That means, basically your skirt is inside out. If you are a new sewer, you should pin your edges here together just to be sure. I never pin, but just for you, I did today. Well, one side. I didn't pin the side I didn't take a picture of. That's how I roll! Oh, and NEVER sew over pins. Always stop and pull them out when you get close. You could sew onto one and break your needle, the machine or yourself if a piece were to fly off. I'm not a nervous nelly, but this is one safety rule I always follow!
 |
| My fabric didn't have a right and wrong side, so it looks like the outside is showing, but really, it's not. If your fabric has a definite right and wrong side, the wrong side should be up! |

5. Now to the iron...You'll want to iron open your seams so they lay flat when you're wearing them. Use the heat best suited to your fabric and iron those seam allowances open like the picture.


Once this is ironed in place, you may want to pin...I live dangerously and went without it. Line up the top fold along the inside of your presser foot. I moved my needle close to the left edge and sewed a straight line all the way around. This takes practice to stay straight and not sew off the edge. Go slow if you're unsure and you'll be fine. (Another sidenote...hems are a great place to use all those decorative stitches on your sewing machine if you're using a plain fabric.)
 |
I started by getting the waistband ready. I did it just like the hem, but first I measured and ironed down a half inch and then measured and ironed down an inch and a half.
 |
| Again, this is the inside of the skirt...sorry for the double sided fabric! |
 |
| This is the outside of the skirt! |


7. Now that your grommets are attached and your waistband is folded back down to sew, go back to your machine and sew the waistband along the folded edge just like you did the hem, being careful near the grommets not to sew over them. EXCEPT, you're going to leave a gap of 2-3 inches unsewn. I usually make this gap near one of the side seams. Once you've got the waistband sewn, you're ready to add the elastic.

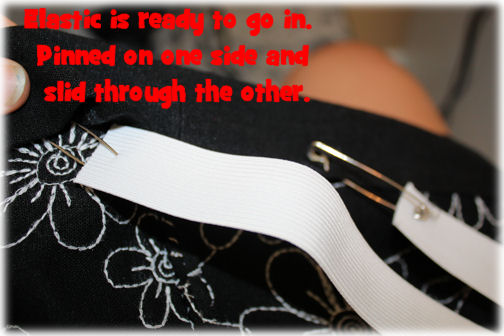
Take your waist measurement from the beginning and cut a piece of 1-inch elastic slightly smaller than that. You want it to stay put! Attach safety pins to both ends of your elastic. Pin one end to the waistband opening and begin to thread the other pin through the channel created by sewing your waistband shut. You can use the pin in the channel to guide your elastic through and the other pin will keep your loose end from getting lost inside the channel. When that happens, you have to pull it all out and start over...you don't want to know how many times I've done that. ;)


8. Now all we have left to do is thread our ribbon through and try it on! Use that safety pin again to put your ribbon through one grommet and out the other. Get it evenly in both holes, trim up the ends (you may want to heat set the ends by holding them near a candle flame. Get them close enough you can see the ends seal without getting so close you set them on fire. But, believe me, you can quickly blow the fire out...I have!) I chose to just cut the ends in a V-shape and call it a day! And you are ready to show off your new creation!


Visiting over from IHRnR....I can't sew a stitch (well on a machine anyway) Thank God for talented people like you!
ReplyDeleteMJ
Lucky7Design
this is so cute! looks awesome on you!!
ReplyDeleteI'd love for you to link this up to my new link party, Your Whims Wednesday! http://mygirlishwhims.blogspot.com/2011/04/your-whims-wednesday-1.html
Oh my gosh this is the most AWESOME SKIRT EVER!!! I'm loving the grommets. I've never tried it but I will have to get some. What a way to dress it up and make it look extra girly! I'm jealous of this one! :) I'm going to have to use this tutorial...I'll add it to my inspiration list :) Oh and not sewing over the needle...done it! It breaks and flies and hits my face :) I'd love to see some of your shirts. I have a few drawn out, too. Now I just need some time.
ReplyDeleteJenny
Congratulations!!!!!!! You were featured on Craft Gossip!!!
ReplyDeletehttp://sewing.craftgossip.com/
You did a great job explaining how you made the skirt.
ReplyDeleteCute! This looks so easy - fantastic job! And I love the ribbon!
ReplyDeleteCute skirt! Anthropologie is one of my favorite places to look for inspiration. Great tutorial.
ReplyDeleteGreat tutorial! Check out my sewing tutorials as well.
ReplyDelete